DIY 3D Paper Snowflake Flower
The holiday season is coming up! Are you looking for easy, cheap and fun ways to make holiday decors? Here is a great and simple DIY project to make a 3D paper snowflake flower. Even if you are not good at crafting, with some cutting and pasting, you can still make this 3D snowflake to decorate your home. You can also work on it with your kids. The snowflake made in this way looks very vivid and beautiful. It makes a nice Christmas decor which you can hang over the doors, windows, ceiling and on Christmas tree. Happy crafting!
What you need:
- Paper: you can use white paper, colored and patterned paper, glitter paper, or other materials such as felt.
- Ruler;
- Pencil;
- Scissors;
- Glue.
How to do:
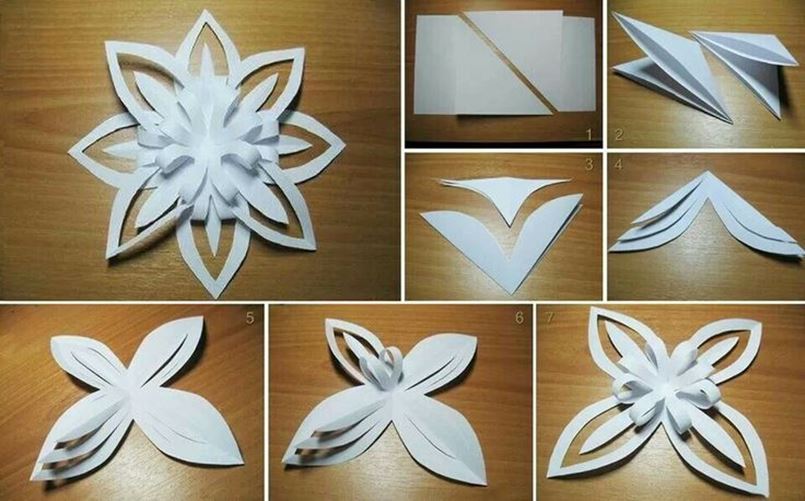
- Take 2 pieces of paper (A4 as shown in photo 1), fold them along the diagonal and cut out the square. Now you have two squares that are folded in triangles.
- Fold the triangles again in half diagonally and now you have two small triangles.
- Draw the petals on one of the triangles and cut out the petals as shown in photo 3.
- Make two more cuts on each of the petal as shown in photo 4.
- Open the paper.
- Fold the middle part of each petal to the center of the flower and secure with glue. This will be the pistil of the flower. Be careful when you are twisting the paper because the paper is very thin and easy to break.
- Repeat step 3 to 5 for the other paper triangle.
- Stack the two snowflake flower together and secure with glue. For the middle part of the second snowflake, you can cross them over the petals of the first snowflake and secure with glue.
- Try different colors or patterns of paper to make this 3D snowflake flower. Enjoy!